Showing posts with label Repurpose. Show all posts

Thursday, January 2, 2014

No Water .. No Flushing.

We got up this morning and we have no water.  We usually open all our lower cabinets on really cold nights to let the heat circulate. 
Of course last night was the coldest night here so far and we left all the doors closed...  Oh well.   Things will thaw out. 
A few weeks ago the system that supplies our neighbourhood with water suffered a broken pipe and it took the better part of a day for it to get fixed.  Then we had a boil water advisory for a few days.  I don't know yet if today it's a town water problem or we have a  frozen pipe.  Whatever it is, it's nothing more than an inconvenience. 

Think about the thousands of homes in the Toronto area, that have had no power  for the last couple of weeks because of the huge ice storms. I wonder how they all coped. I really feel bad for them.  I think it's way easier to get by when you live in the country than it is when you live in the city. 

The first thing I really miss when the water is off is not being able to flush.  What if you had to go without any power for a few weeks. If you live in an apartment building or a home without an alternate heat source,  pouring water down your drain will only freeze. 

This article  has a good instructions on how to put together a homemade compost toilet that could be used in an emergency. It can be used in any type of home.  All you  need is a five gallon bucket, some heavy duty garbage bags and some kitty litter or sawdust.  Line the bucket with the garbage bag and after each use cover waste with sawdust or litter. 
Everything can be stored in the bucket until it's needed, and with any luck you will never need to put it together. 

DIY Composting Toilet
You could take it one step further and make the milk crate cover so you can have a luxury unit like this one. Click on the picture to read the article.
I hope this idea helps a few people be a little better prepared for what ever happens next.

Bye for now.. and have a good day.

Sunday, September 15, 2013

This Weeks Treasures 3

Found at the CURB

Most of the yard sales for this area are over for  the season, but lucky for me there are still some curbly treasures out there.  Hubby and I went for a drive this morning and decided to head to a nearby town for some breakfast.  On the drive back I spied a bunch of  doors  and windows in front of an old motel that was closed down. We had already passed the driveway when I spotted "Free" painted on one of the doors. Well you know me enough by now to know I got really excited and I couldn't get hubby to turn around fast enough. We had been to a   re-store on Saturday and the cheapest solid wood doors I could find were $50 so this definitely warranted some investigation.

 What an incredible find.  Here were four Solid wood doors, very old, very chippy and very beautiful.  Two of them even had the glass intact.
And a bonus, a motel style double headboard. 
Unfortunately the windows were rotten and unsalvageable. 


See the pretty trim board below the window on the pink door. And the mail slot cut out. 
Fabulous.
I wish I had taken a picture of them before we got them out of my Escape.  They wouldn't quite fit so they hung out the back about a foot and we tied the back door down with the cord out of a hoodie. They do say, "Where there's a will......" 

 I have been looking at projects made from old doors recently  and am really excited because now I can actually make some of them :)


Bye for now.... and have a good day everyone.

Friday, September 13, 2013

A dining room buffet makeover

I've recently done a few pieces of furniture that I have for sale in a beautiful antique blue colour that I absolutely love. 
My buffet and shutters in my dining room needed a makeover so I mixed up a batch of my homemade chalk paint and got busy.


The shutters had been painted in a green that matches my backsplash but that needs a makeover as well .
My wonderful daughter in law gave me the buffet recently,  but it was dated and in desperate need of a pick me up.


I use this area for storage and a coffee bar to save space in my tiny kitchen.


First I got some help from hubby to lift  the buffet onto my work table and  remove all the drawers and doors. I had no intentions of being  belly to floor with a paint brush in hand trying to paint the bottom edges.


After a good wash to remove any grease and cleaning agents I got busy painting.  This is the outside after the first coat. It only needed 2 coats because this paint has awesome coverage.


I wanted to paint the inside as well. I will be using this piece a lot and the lighter colour will make it easier to find things.   And to be honest it will inspire me to keep it tidier as well :)


 Much better.


I took the handles off the doors and raised them off the work surface by setting them on a few plastic bowls.  I painted the hinges because I didn't want them to stand out.


I painted the body  with a lighter shad of the blue, by adding 1 part blue to 3 parts white.  I used the full  blue for the top of the buffet, the door fronts and the shutters and shelf.
 
I got the mirror at a yard sale a few weeks ago and thought it would look good here. 


I only reused one set of shutters instead of the solid shutter wall I had before.


Here's the buffet all finished. After painting I gave it two coats of paste wax to protect it.
 I really want to get new  handles, but can't find ones I like so for now I will use the originals.


 I've decorated with a few of the items I had on the shutters and shelf from before.  
 
I don't quite think I'm done with this yet. 


I love these little glass jars I got at a yard sale.   And of course a chocolate and a vanilla candle will make everything smell awesome as well.


Just a bit of what's on the top shelf.  The tins were my grandmothers. The dark blue tin always had buttons in it and the light blue one still has a little label on the lid that says ribbons and bows.  Memories of grandma's sewing room at the end of her hallway linger with the tins


.


And of course I love the old mason jars, one is a Ball and the smallest is a Crown .


I have a small collection of old wooden rolling pins and a few pieces of old style kitchen tools.  I'm considering the shutters as a display area if I can find a new home for the old family photos. And maybe a nice large piece of subway art between the shutters. What do you think?


WOW!   I'm not even done with this project and I'm already trying to figure out how to change it up. Oh well. It's really a lot better than it was.  I'm really happy with the buffet and that was my main goal here. I love having the extra storage space too.  All in all  I think it was a well spent weekend.


Bye for now ... and have a good day everyone.
 

Monday, August 19, 2013

River stone Hot Plates

I love these little hot plates I made from river stones.  Such a country thing to have in your cottage kitchen, or in any country themed décor.


I picked up a handful of these little 8 inch straw mats at a yard sale this weekend. You see them everywhere and no one really knows what to do with them any more.


My dear hubby installs flooring and river rock is really popular in showers now so there are always little unused pieces of the flooring leftover from jobs.  It comes pre glued to sheets for installation, and being the hoarder I am he brings the bits home and I take all the little stones off the sheet and save them.  Free craft material... gotta like that.


I haven't done anything using my glue gun lately and I knew it would be so much better than waiting for glue to dry.  I decided I wanted the first one to be darker stones so I separated light from dark and arranged them onto the straw mat. 


Once the arrangement was ok I glued all the stones on the mat. These stones are for the bottom of a shower so they are kind of flat and very smooth.  They are meant to be nice for your feet.  The bonus is that a hot pot will sit on a flat surface.


When I was done I did the same with the lighter stones on another mat.


Here are my hot plates finished. Aren't they cute.  I love how they turned out. Very  beachy cottage chic. What do you think?


Bye for now... and have a great day.

Saturday, April 20, 2013

DIY AquaDuck

Last night I was catching up on some of my blog reading and when I read this one  and I was done.  I had to have one of these.   A simple Faucet Extender makes it possible for kids to wash their hands independently!
Of course it makes it easier. When I put my toddlers up to the sink on a stool they can reach the sink, but its an almost rib crushing experience for them to reach the water. This brings the water to them.


When I see something I just need to have, I need to have it NOW.   One of her readers mentioned you could make one from a baby oil bottle so I checked out faucet extender and found all kinds of ideas.And I sure wasn't paying for this when I could make something myself.

This was the one I came up with to fit the shape of my faucet.


I choose this bottle from my bathroom closet. I was almost empty and the label peeled off so I would have a nice clean finished product.


I removed the label and  marked where I wanted to make my cuts. I used a grease pencil to make my lines so I could clean off anything that showed when I was done.


When I  finished cutting this was what I was left with.  The cut through the cap started as a single slice and I just played with it until it fit over my faucet but was still tight enough to stay put. It snaps on and off very easily. 


I absolutely love how easy this was and how much use it will get with my kidlets.  And the whole project from start to finish was about 15 minutes.

My four year old granddaughter was the first one to try it and she loved being able to reach the water and do everything herself.
 

 Of course you can purchase the real item from Amazon  Canada for $21.99  plus your shipping and taxes, but mine works just fine and my total cost? a whopping $0.    Love it.


Have a great day everyone.

Friday, April 19, 2013

Coffee Mate Containers.

After last weeks ice storm the weather has finally warmed considerably.  With temps in the double digits and a good rain we can see the snow melting more every day.  This has me thinking about spring cleaning.  Hand in hand with cleaning go my issues with storage.

My biggest problem area is in my tiny  kitchen.  Moving from a house with extra storage in a garage and basement I have been trying to find places for a ton of stuff I need only once in a while as well as the items I want at hand for convenience because I use them almost daily.  With about half the cupboard space of my old kitchen this has been quite a challenge. 

I am a coffee lover.  It is an absolute must in the morning, but I also love my afternoon and evening decafe.   I drink mine with the original Coffee Mate creameer and for years have been putting those neat little containers with the red lids into the recycle bin.  Then last week I had a duh moment and decided to do this with them.


All I did was remove the plastic label, clean really well, and add some neat little labels I found here.  I used a white glue and they stuck really well. I added some over the front of the label too so I could wipe them clean.  They are sitting on the back of my stove.

This space  was not used for anything useful and they fit really  well.  I can imagine a nice row of them with  sugar,  flour,  cornstarch,  salt  and whatever else I can fit .  In my kitchen this small storage solution is a really big deal.

I searched pinterest to see if I could find some other cool ideas for these nifty little containers and some of them are kinda cute.  I will have to see once I get enough to use  here. Well I have the weekend off so I am going to do some of that spring cleaning I metioned.  Something to look forward too.  :)

Have a good day everyone.

Monday, March 25, 2013

Character with Shutters.

We've been in the new place for 6 months now and I'd like to share a couple of the things I've been able to do with no cash. Which is exactly what my budget is right now $0.

When we first moved in there were shutter doors on both the closets in the laundry room. It's a nice enough room but both the doors opened into the room. When they were open it was very hard to access the closets. My solution.. remove the doors. I'll have to decide what to do with the closets at another time, maybe some nice curtains.

So I have 2 sets of shutter doors and I never throw anything away. This is where I head to pinterest for some inspiration. There are so many things to do when you are decorating with shutters..Here are a few of my favorite pics.


A great  shelf  with coat hooks.


This headboard is fabulous.


This Hall Tree is great and I love the chippy corbels.


This is what I did with mine. I painted both sets a light aqua. I had this can of paint on hand. It was left by the previous owners. It's a  vintage aqua colour and I  love  it.    My grandaughter Amber was helping so it was a fun day for both of us. Then I attached both sets onto the dining room wall with just a few screws  and added the shelf above. Then all I had  to do was unpack a few  items and put them on the shelf.  I added some of my favorite family photos. Some  very old ones and some  a little more recent.


I really love this look.


I'm quite happy with the results. It really adds  character to what was a huge blank space.  If you would like to see more shutter ideas here is a link to some great pics on pinterest.  Have some fun looking at these great ideas and enjoy your day.

Sunday, March 24, 2013

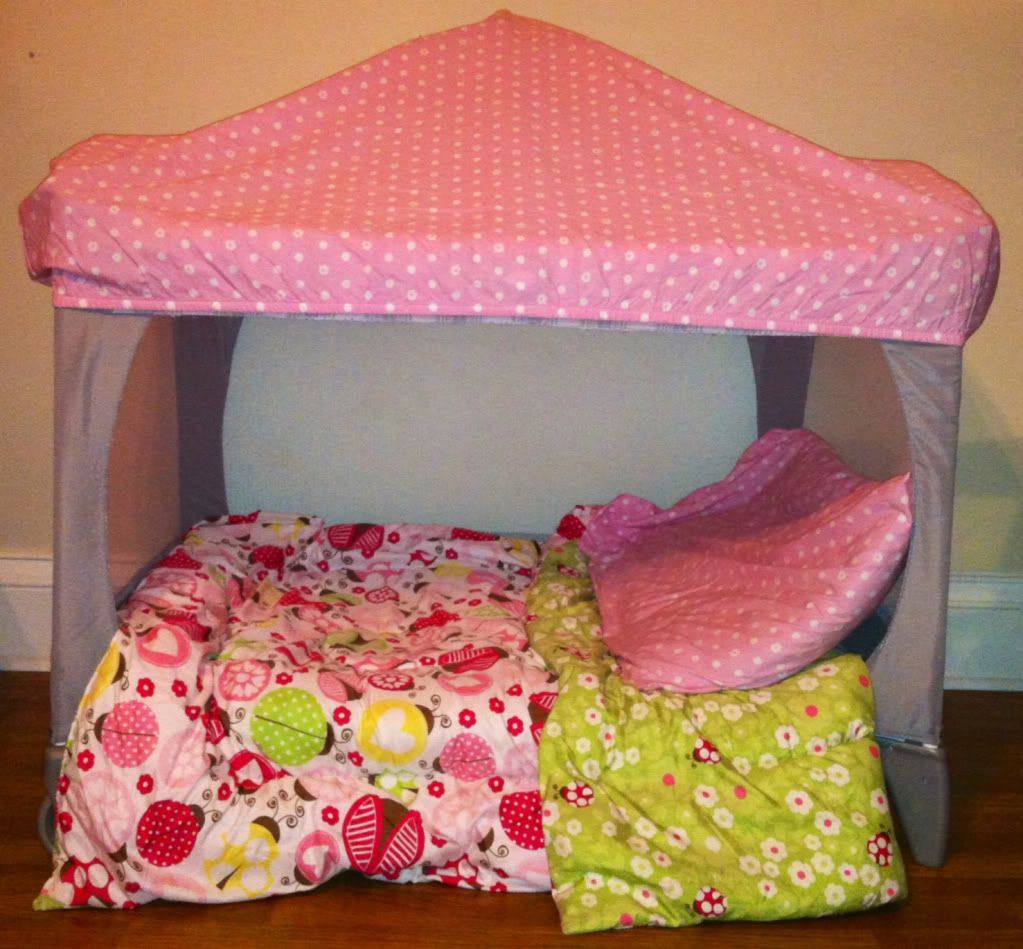
Fun in a playpen

 
I first saw this on pinterest, and with the kids getting a bit of cabin fever I decided I needed to give them something new to do for a bit.. The little ones I care for are quite tiny still and it is very hard for them to get around outside in the deep snow.
 
 
Pack n play repurposed on pinterest.
   This is what I did with the damaged playpen I had. There was a large tear in the side of it so I cut the netting out on that side.  I positioned it in the corner where there was a ceiling hook above.  I hung the mosquito netting canopy I had from another time over the playpen and just pulled the netting through the corners and  knotted it . I added a butterfly to the net and a few blankets and stuffed toys and the kids had a ton of fun all week playing in the finished result.

What I loved about this project is how easy it was.  The whole thing took about 30 minutes total and was totally fun.  I can take it down when the kids get bored with it and just put everything away. All the items can be reused again and the playpen can be covered with a different top for a whole new adventure.